How to take the best product photos for your socials
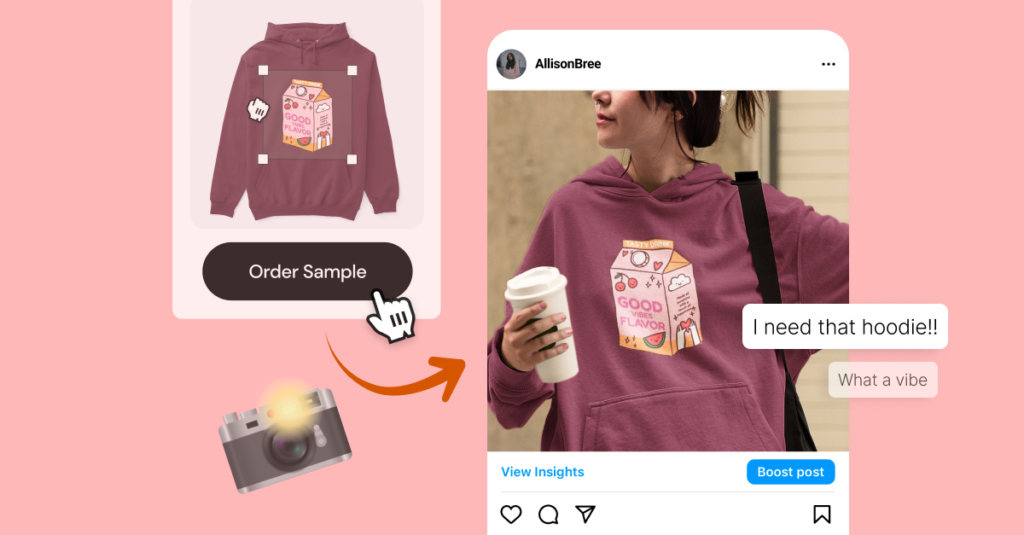
We are now in the era of social commerce. Product photos are as important now as ever. It really is the deciding factor on whether someone clicks on your post––or not. But as always, Spring has your back. While you can’t do custom product photos on Spring (yet), you’ll want to order a sample so you can take custom photos for your social platforms.
Here are 11 great tips on how to take the best product photos for your socials.
1. Native.
Take a photo of the item in its native environment. This means either take a photo of the item with you, or wherever it would naturally be used. For example, if your product is a beach towel, put that baby on some sand.
2. Natural Lighting.
Lighting is key to great quality. Use natural lighting when possible. This will show off the true colors of the product. It’s easy to become obsessed with the correct lighting equipment but natural lighting not only offers a more cost-effective method but is true-to-life.
NOTE: You can’t control natural lighting. Maybe it’s sunny now and overcast in an hour. In that case, have a cheap lighting kit as a backup but try to combine natural lighting with artificial lighting. If you need to use white bounce boards to get rid of shadows or a diffuser sheet (if the sun is too bright), you may want to invest in those items.
3. Different angles.
When consumers see a product from multiple angles, they are more likely to imagine themselves using the product. There are many angles to shoot from, but the 6 angles that will serve you best are:
Front
Profile (side)
45-degree
Back
Top (shot from above)
Macro (tight or close-up shot)
4. Flat lay your products with other items.
Associate your products with complimentary items. For example, T-shirts w/ pants and a bag or handbag, or a mousepad near the computer, or a person holding a mug with coffee in it, etc. This form of product photography also helps your brand tease other new products, piquing consumer interest and ultimately driving more traffic to your Spring store.
5. Neutral background.
Still photos work best with neutral backgrounds (white or black for example). When in doubt, use a white background. This is for two reasons:
White backgrounds have great light reflection, meaning you don’t need a huge lighting setup.
White removes distracting or confusing backgrounds, keeping the focus on the only thing that matters––the product.
6. Know the aspect ratios of your platform.
Different aspect ratios may dictate how you shoot. For example,
Instagram – Keep a Consistent Photography Theme. The types of photos you use on your Instagram profile will impact its visual appeal. There are many Instagram themes that you can use, just ensure your Instagram photos showcase your products in the best way possible. Instagram post sizes are: Landscape: 1080 x 566 pixels Portrait: 1080 x 1350 pixels Square: 1080 x 1080 pixels.
Threads (Instagram’s Twitter twin) – The standard link share image will be cropped to a 2:1 aspect ratio on Threads.This is a little bit wider than link share images on Facebook, Twitter, and LinkedIn, but the same images should work just fine on Threads.
Facebook – Facebook timeline photo and post sizes: FB automatically resizes and formats your photos to be 500 pixels wide and to fit the 1.91:1 aspect ratio. But avoid pixelation or slow load times by remembering these sizes: Recommended size: 1200 x 630 pixels Minimum size: 600 x 315 pixels
LinkedIn – Sponsored content images: 1200 x 627 pixels (1.91:1 aspect ratio) Sponsored content carousel images: 1080 x 1080 pixels (1:1 aspect ratio)
Twitter – Twitter image sizes for in-stream photos: 1600 x 900 pixels (recommended) or any aspect between 2:1 and 1:1 on desktop; 2:1, 3:4 and 16:9 on mobile.
Pinterest – Pinterest image sizes for ads and carousels: App install ads: 2:3 aspect ratio is recommended; 1000 x 1500 pixels recommended. Carousel Pins and ads: aspect ratio of either 1:1 or 2:3. 1000 x 1500 pixels or 1000 x 1000 pixels recommended; Up to 5 images can be included in a carousel. Shopping ads: 2:3 aspect ratio is recommended; 1000 x 1500 pixels recommended.
Snapchat – Snapchat ads image size: 1080 x 1920 pixels (at minimum) Aspect ratio: 9:16.
7. Tools (hardware or apps) you may need.
Phone – Much cheaper than a professional camera, your smartphone has professional camera tools that can do the job perfectly.
Tripod or stand – You will be surprised how handy it comes in for certain shots but if you do product shots, it’s a must to keep the camera steady.
Backgrounds/Backdrops – These are real (not digital) backgrounds/backdrops that you place under and behind your products so that you don’t see a seem, as you would if you simply shot with a white wall behind the product. Worth every penny, considering how essential it is to have certain backgrounds.
Wireless remote.
Add-on lenses (optional)
Adobe Lightroom app (which has a free version, or you can opt for the paid version which comes with additional features). This allows you to edit your photos, whether it be cropping, coloring, etc.
Lightricks’ suite of photo editing tools (Facetune, Filtertune, and Photoleap). If you don’t want to invest in paid third-party apps, most smartphones come equipped with some decent native photo-editing tools. Experiment with your phone’s built-in contrast settings, creative cropping, portrait mode, and more to create some stunning effects — without professional photography skills!
8. The Rule of Thirds.
This is a known rule in photography (video or stills). Imagine your image is cut into 9 equal squares, meaning you will have two evenly spaced lines horizontally and the same vertically.

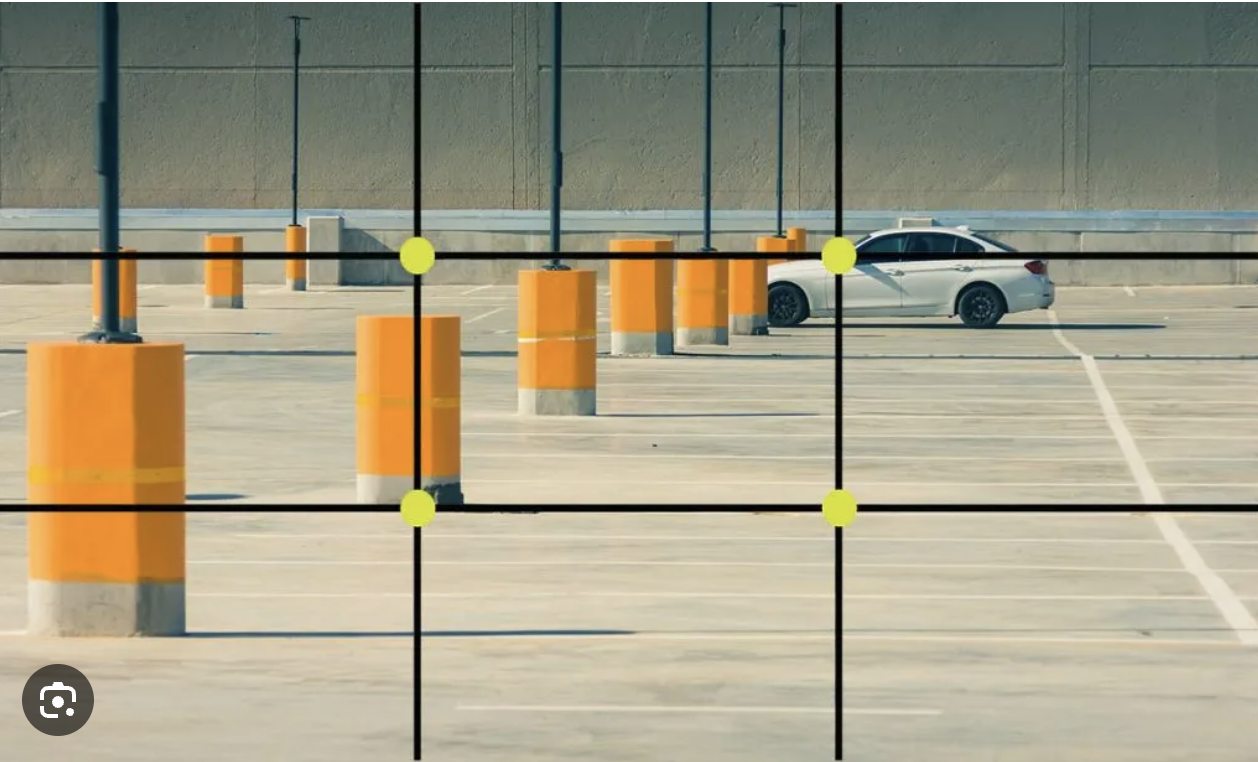
The focus of the photo should be approximately where these imaginary grid lines intersect. If your subject is in the upper right intersection, for example, this would leave the other two thirds of the space open, attracting and drawing the viewer’s interest. Most smartphones have a “rule of thirds” feature that you can activate. If you have that feature, try following these steps: Open Settings > Click Camera. >Toggle on the Grid option under Composition.
For Android: Open the Camera app. > Click Settings. >Turn on Assistive Grid.
Note: You won’t see the grid on the final photo, only when you take the photo. Keep in mind the rule of thirds is not a universal law. There are occasions when a perfectly centered shot is more appropriate. Use your judgment.
9. Set your pixels correctly.
To put it bluntly, it doesn’t do you any good to go through all the effort to produce a professional-caliber photo if you don’t set your pixels correctly. For example, a 5 X 7 print on your refrigerator requires a lot less pixels than a giant billboard on a building. Your pixel count tells you how detailed an image will be, and goes hand in hand with photo resolution. Nowhere does resolution matter as much as on social media. The higher the resolution, the more details. Conversely, with a low resolution photo it won’t matter how good your production value was when you took the photo. It will look unprofessional. Crisp images with the highest level of detail is what you’re aiming for. You’ll want at least 10 to 20 megapixels. There are smartphones out there that can shoot up to 40!
10. Set your white balance.
Based on the light temperature in your setup, touch the WB button on your smartphone, then touch the white background. Check the exposure. Tap the circular Exposure button, then tap your product so the camera knows to expose it.
Keep everything in focus. Now touch the circular Focus button, then tap your product so the camera knows to properly focus on the product. Lock your camera settings. Next, tap each button again to lock the settings in place. This will stop the camera from adjusting settings while you’re taking shots.
11. #Hashtags.
Regardless of your niche, add relevant hashtags to your posts so that your brand can get the exposure it deserves. In many cases, customers would not have discovered stunning product photos if the creator hadn’t included the hashtag in the post.
4 LITTLE BONUS TIPS:
Don’t do selfies (you might be in focus, but your product won’t be), don’t use the flash (overexposure), and don’t zoom (lower resolution). These 3 things lower the overall quality of your photos. And the fourth tip is if you’re using a smartphone, go horizontal instead of vertical. Landscapes are easier to crop. You’re welcome.
Start taking your social product photos now!
Don’t feel obligated to get every piece of equipment right off the bat. Apply these tips gradually to see what paints your products in the best light, and adjust your approach as you improve. Happy shooting!